“This post was originally published in [2025] and has been fully updated for 2026 with new data and tools.”
“You only get one chance to make a first impression.
If you don’t have the right pages and settings for a new blog, you risk looking like an amateur before you even write your first post.
Beyond just an ‘About’ page, there are legal and technical requirements that most beginners overlook.
In this guide, I’ll show you exactly what to set up to look like a pro, and I’ve included a free tool to help you double-check your progress.”
A new blog should have a few key settings and pages, such as an about me page, privacy policy, cookies, affiliate link disclaimer, and a site map.
Keep reading for step-by-step instructions on launching your blog, including the must-have plugins!
✅ Blog Setup Verifier
Don’t launch until these are checked!
0% Ready to Launch
Best WordPress Settings for SEO and Security (New Blog Guide)
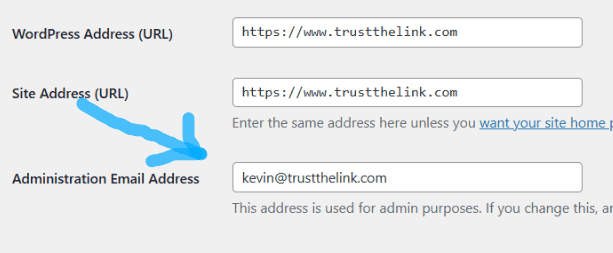
When you first start your Administration Email Address will be the one that was used to purchase the domain. The first thing you could change is this email address to one that matches the domain.
All you have to do is go to the settings menu, then the general tab.
Then update this to your website’s email.
Next is changing the date and time settings. You want to change the time zone to match where you live. You can also change the date settings to your liking and when the week starts. I like starting the week on Monday.
Remember to change savings.
Next, go down to the reading tab and change each post in the feed to include an “excerpt,” not full text. This may depend on your theme, but it could make things look nicer!
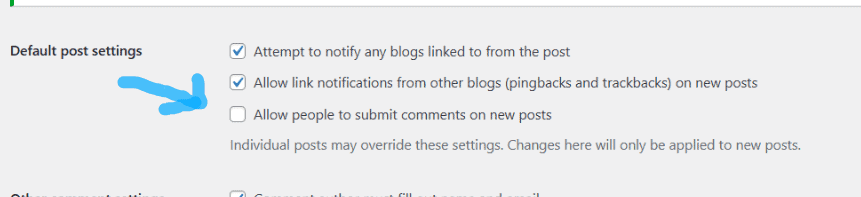
Also, in the discussion tab of settings, you can control comments. The two best choices are…
- Do not allow any comments
- Hold comments for moderation.
If you don’t want any comments, just uncheck the box that says “allow people to submit comments on a new post.
I decided not allow any comments on my blog.
When I got trained by people who are MUCH better than me, I was taught just to leave comments off!
Another idea is to “allow comments, but they must be manually approved.” Otherwise, you might have to worry about bots and irrelevant links.
To find this option, just scroll to the very bottom, and there is a box that says “Comments must be manually approved,” and check it!
However, comments could be good too, almost like a YouTube channel or TikTok profile! It really is your choice. Remember to save the changes.
Next, click on the permalinks tab of settings. These permalinks are important. When you publish a blog post, NEVER change the permalinks because this can hurt you. It’s like how your post is found, the web address.
You just want to change this to the post name. Having the keywords in the post name can help you rank in Google and help with SEO. Plus, it’s just better than all the other options.
I do know 1 person who only puts the keywords he is going after in the permalink, so that is not a bad idea, too!

Remember to save changes!
Next, go to the Users tab under the Plugins. You can change your first name, last name, and nickname.
Then enter your website, just the primary domain here. You can also enter a short biography of yourself! What do you enjoy doing when not working at a job? What are your interests? Remember to save changes.
You can change your profile picture; all you do is hit the Gravatar button. Then enter your email address, confirm it, and you can change your profile image. The image can be a logo or your own picture.
The easiest place to create a free logo might just be Canva over HERE. If you want something better, then you might want to go over to this place HERE.
Gravatar is a free service where someone can create an avatar that can be used across the internet and on websites that support it.
Also, you can add users to your website under the tab Add User under the Users tab. Once you set up a password, they will have the option to change the password if they want.
You can also assign them a role such as…
- Subscriber – Lowest role and can’t edit anything.
- Contributor – Can write and edit articles, but can’t publish anything.
- Author – Can publish articles, but can’t edit other people’s articles.
- Editor – Can edit and publish articles, but can’t edit the website or change settings.
- Administrator – Can do everything.
If you give access to other people to your website, these options are great for your website’s security.
I’m sure there are other settings to tweak with, but hopefully, this gives you an idea of the important ones. Next are the important pages you should have.
How to Write an Engaging About Me Page for Your Blog
One of the essential pages is an about me page. The goal is to tell users…
- More about yourself.
- What help the reader may get.
- The purpose of the website.
If you’re “really” stuck, you can always use ChatGPT to come up with some ideas. However, you want this in your own words because it is a little strange to have a robot tell you WHO you are, right?
Just be yourself, how can you be of service to the reader? Then publish it!
Legal Requirements: Setting Up a WordPress Privacy Policy Page
Create a new page and name it “privacy policy.”
Laws require a website to have a privacy policy page. This is an easy page because all you do is grab a template and post it to your website.
A website like this HERE is great to use. Post the template to your website, then remember to enter the details of your website into the template.
As always, save your changes and publish the page.
Next, in your settings, go to settings and privacy tabs, select a new page, and use the new page you created.
Why Every New Blog Needs a Professional Contact Me Page
Another great page to have is a Contact Me page.
You can enter ways someone may get a hold of you, such as email and social media contacts. If you’re brave, you can even post your phone number.
Trust me, nobody will probably EVER call you, but it adds credibility and helps your brand because you are trying to help.
For 2 years, I cold-called TONS of business owners to get them a nice tax credit due to COVID, and rarely has anyone called me. Plus, it’s not easy picking up the phone and calling someone. Nobody does it!
You would be lucky to get 1 text!
How to Create an FTC-Compliant Affiliate Disclosure Page
If you are going to have affiliate links in your blog, you need to disclose it. Create a new page and enter Affiliate Disclosure as the title.
Then the easiest thing to do is go to this website HERE and just copy and paste a disclaimer. Then publish it!
Adding a Sitemap to WordPress to Help Google Rank Your Site
Another great page to add is a sitemap. This helps search engines find your web pages more easily. A really easy way to do this is with a plugin such as the All-in-One SEO plugin.
Of course, a better plug in Rank Math SEO. The free version has a way to index posts as soon as published or updated.
Just go to the plugin tab and in the search bar type in “All In One SEO” and then install it, activate it, and it can help create this page for you.
How to Build a Resource Page to Boost Affiliate Commissions
A resource page is optional, but it can be a good idea. With this page, you have all the resources that you recommend in 1 spot. These could be affiliate links or not.
It’s good for the reader to be able to find everything in one spot, plus you can earn money from it.
Another great idea is to use a resource page as a free gift for someone who subscribes to an email newsletter. Convert your resource hub into a PDF, and “BAM” you have a nice gift to give someone!
Easy Guide to Organizing Your WordPress Footer Menu
Lastly, these pages can easily be put in the footer of WordPress.
Just go to the Appearance tab and click on the menu button. Then add the pages to the menu, and at the bottom, you can click on the footer button.
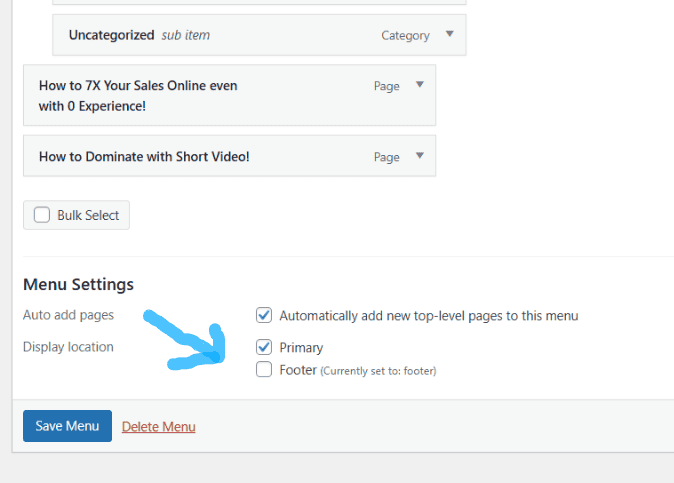
Depending on your theme, you might need to tweak your home page and menus. Try to make it look clean and uncluttered!
Top 10+ Essential WordPress Plugins for Speed and Security
Oh, and there are a few important plugins that are good to have.
- UpdraftPlus – Backup/Restore
This is very nice because it backs up your website. Go to Plugins search for UpdraftPlus – Backup/Restore, then install it. Next, click on the settings of the plugin.
You choose what to back up and how often. I choose weekly for the first number file backup (it’s large data), and keep 4 on hand. This means it keeps 4 on hand, and after a month, the 5th gets deleted.
The next number is the database backup (smaller files), and I choose daily backup, and I keep 7 on hand. Remember to save changes.
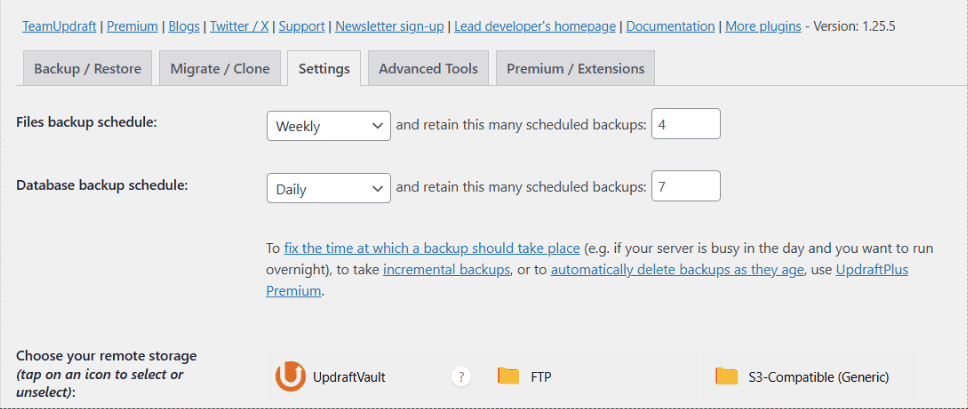
Next, it’s good to save a copy of your website completely off the site. If you scroll down in the settings, you can choose where to store it.
You can choose any cloud service that works. I just used Google Drive. Next, you choose what files to back up, and I just checked all the boxes. Finally, save the changes.
You then have to authenticate the cloud service by logging in and connecting the two. You should be done.
- Pretty Links
Pretty Links is an amazing plugin because you can change 1 link and it automatically changes all the links that look the same. For example, I have an affiliate product on multiple pages, but that product was discontinued.
Instead of finding each link and changing it, I just have to change 1 link in Pretty Links. Cool right?
This has happened to me! Another benefit is that you can track who clicks on the links and see how well you are doing!
- WP Super Cache
This helps the speed of your website and user experience. Nobody likes to wait for a website to load. Plus, slow websites can hurt your ranking in Google.
- Lazy Load for Video
If you are going to post videos on your website, this makes everything faster! Videos are amazing too, because it adds to the user experience. Even better if they are videos on your own channel!
- ShortPixel Image Optimizer
- Resize Image After Upload
These both decrease the size of images, which saves server space and speeds up your website.
- Big File Uploads
This is great if you upload big files like eBooks or courses to your website.
- Limit Login Attempts Reloaded
- Select Titan Anti-spam & Security
- Really Simple Security
These are great for security.
- Fonts Plugin | Use Google Fonts, Adobe Fonts, or Upload Fonts
If you want to add more fonts to your website.
- Site Kit by Google
This helps with Google Analytics and more. “Update” – After I removed this plugin from WordPress, the Speed of my WordPress site increased. I went from a score of B to A on this website HERE.
- Autoptimize
- Asset CleanUp: Page Speed Booster
Both are “very” amazing. Asset CleanUp gets rid of any code that you may not need. Autoptimize speeds up your website.
Any plugin you don’t need, I recommend deleting, and your site will be faster!
Conclusion
It’s important to know that having too many plugins can slow your website down.
It’s sort of like backpacking, the less weight the better!
For a complete guide that has 10 steps on how to dominate with blogging, check out this post HERE. I also share 20 reasons blogging is still a great tool for a marketer!
I hope this post might have been helpful!